Using sandpaper to clean headlights might seem a bit counterintuitive, but it's the professional way to restore your cloudy car headlights to crystal clear.

"Hey! Guess what guys??!! You can clean your car headlights with toothpaste!" Says everyone, everywhere, all the time. I'm calling bullshit. Toothpaste might gets some dead bugs off, the same way it'll get dead bugs out of your teeth. But to really whiten and brighten either of them, you need to do a little work.

Herein lies the problem with social media. If an idea sounds plausible, practical and stupid-easy people are willing to share it, like it and pass on this super-secret bit of information with a knowing wink. They've done this with "the toothpaste trick."
Even though they've never tried it themselves.
So of course I had to try the toothpaste trick.
Table of Contents
The Toothpaste Trick -fail
Just take some toothpaste and rub it on your cloudy headlight, then buff it off after it dries a tiny bit.
When I did this, all I got was a minty fresh headlight that looked like it was on the waiting list for cataracts surgery.
So I did my thing, dove into the research, compared the most difficult with the easiest methods and came up with a solution that's in between (but admittedly leaning towards the more difficult because those are generally the methods that actually work)
Why Headlights Get Cloudy
It's because headlights are made of plastic now, not made of glass the way they used to be. They're coated with a UV protectant to keep the plastic from getting ruined and drying out.
That UV protection is what becomes a disaster over time, clouding up, getting brittle, oxidizing and making your headlights opaque.
To make them shine again you need to scrape off that yellow, cloudy, flaking UV protectant.
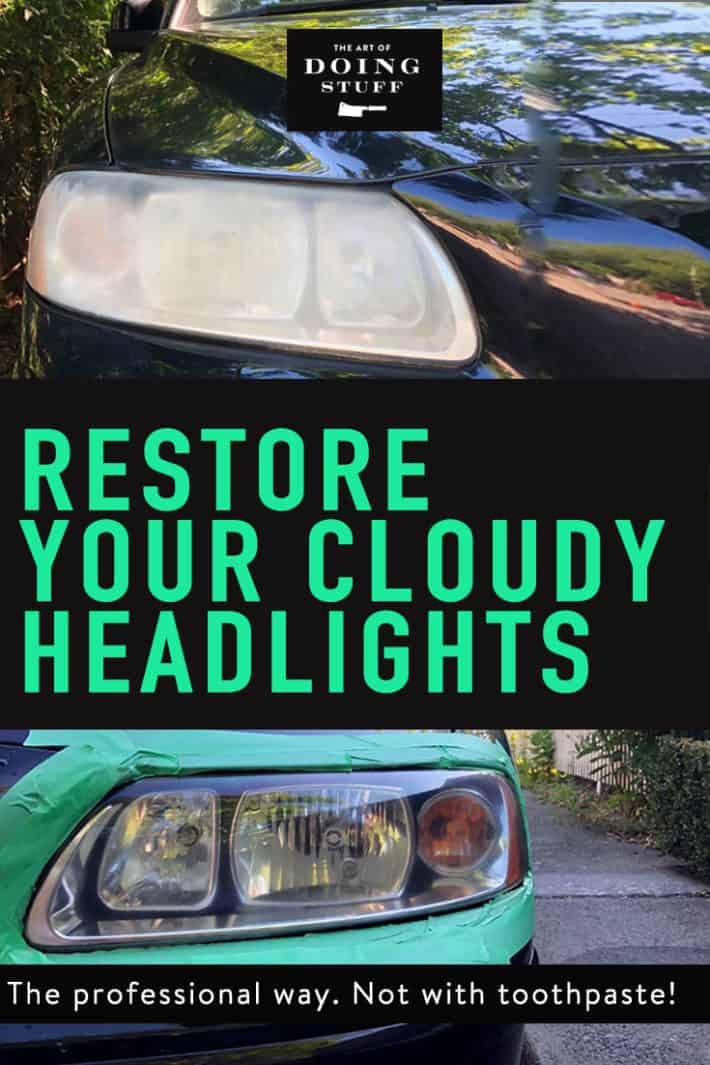
It's a bit of work and will probably take you around an hour. Not convinced? Here's my before and after.
Good. I'm glad you've decided to go ahead with restoring your headlights. You're a champ.
Headlights From Cloudy to Clear

To clean your headlights you have to sand off the portion of them that's actually cloudy. That's the old UV coating. The best way to do that is with sandpaper.
Materials
320 - 800 grit sandpaper
1000 - 1500 grit sandpaper
2500 - 3000 grit sandpaper
Padded sanding block or dish sponge
Isopropyl Alcohol
Headlight polish/levelling compound
Headlight Clear Coat/UV Protectant
Orbital Sander
Water
Soft Cloth
Painter tape
**Or - you can go the easier and probably cheaper route and buy an entire kit on Amazon.**
Entire Headlight Restoration Kit (hand powered with drill attachment for polishing)
Entire Headlight Restoration Kit (drill powered)
I didn't even THINK of checking Amazon for headlight restoring kits so I bought everything separately at my local automotive store.
Automotive stores are where you can get sandpapers with this sort of grit along with the polish and clear coat.
Instructions
320 - 800 Grit (dry sand)
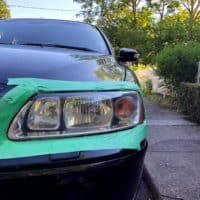
- Tape around your headlights to protect your car paint. You can use masking tape. I used painters tape.
- Sand, yes SAND, your headlights in a left to right motion. The worse your headlights are the lower the grit number you should use. I started with 800, but probably should have used 400 to make the job easier. Keep your sanding pressure even and fluid. Your headlights will get even cloudier at this point.
- Rinse the headlight with water and wipe with a cloth to clear away any debris.

1000 - 1500 Grit (damp sand)
4. With a little water on the sandpaper sand the headlight again with this finer grit sandpaper in an up and down motion. The reason you change directions is because you're sanding down the ridges you've caused by the rougher grit sandpaper earlier.
5. Rinse with water and wipe with a soft cloth to get rid of plastic debris.

Would you like to save this stuff?
2500 - 3000 Grit (damp sand)
6. The final sanding step is to use the finest grit with a little water and sand in a left to right motion again.
7. Rinse with water, wipe with soft cloth.

Buff/Polish With Wool or Microfibre Pad
8. Attach a microfibre of sheepskin pad to an orbital palm sander.
9. Add compound to the pad and rub the polish into the pad so it's evenly saturated.

10. Polish headlights. The headlights will start to look clearer now.

Wipe with Isopropyl Alcohol
11. Wipe the headlights clean with Isopropyl Alcohol.

Spray with Headlight Clear Coat
12. Apply the clear coat / UV protectant according to directions. Mine was a spray, yours may be a liquid you wipe on.

You're done.

Take a look at the before and after again.
Cleaning your cloudy headlights doesn't just make your car look better it increases the output of your headlights by 400X. I made up the 400X but it makes a huge difference.
You'll be able to see in front of your car better at night and other people will better be able to see you.

All for about an hours worth of work and around $25 (if you buy one of the kits). Here are the links to the kits again:
2. Headlight restoring kit with drill attachment for all steps.
I'd personally buy the first kit because it has a separate polish and UV coating. The second kit seems to just have the polish.
How to clean headlights
Instructions
320 – 800 Grit (dry sand)
- Tape around your headlights to protect your car paint. You can use masking tape. I used painters tape. Sand, yes SAND, your headlights in a left to right motion. The worse your headlights are the lower the grit number you should use. I started with 800, but probably should have used 400 to make the job easier. Keep your sanding pressure even and fluid. Your headlights will get even cloudier at this point.Rinse the headlight with water and wipe with a cloth to clear away any debris.
1000 – 1500 Grit (damp sand)
- With a little water on the sandpaper sand the headlight again with this finer grit sandpaper in an up and down motion. The reason you change directions is because you’re sanding down the ridges you’ve caused by the rougher grit sandpaper earlier.Rinse with water and wipe with a soft cloth to get rid of plastic debris.
2500 – 3000 Grit (damp sand)
- The final sanding step is to use the finest grit with a little water and sand in a left to right motion again.Rinse with water, wipe with soft cloth.
Buff/Polish With Wool or Microfibre Pad
- Attach a microfibre of sheepskin pad to an orbital palm sander.Add compound to the pad and rub the polish into the pad so it’s evenly saturated.Polish headlights. The headlights will start to look clearer now.
Clean
- Wipe the headlights clean with Isopropyl Alcohol.
Clear Coat
- Spray with Headlight Clear CoatApply the clear coat / UV protectant according to directions. Mine was a spray, yours may be a liquid you wipe on.You're done!
If your headlights are a disaster, ditch the toothpaste. Do the job right.
→Follow me on Instagram where I often make a fool of myself←


Misti Smith
You always have the best tricks and tips with a huge flair of comedy. I love your attitude and blog. Wish you lived closer to you could come visit our little tribe of artist, gardeners, wood workers and crazy craft supply hoarders. Keep us the crazy shenanigans !!!