Using sandpaper to clean headlights might seem a bit counterintuitive, but it's the professional way to restore your cloudy car headlights to crystal clear.

"Hey! Guess what guys??!! You can clean your car headlights with toothpaste!" Says everyone, everywhere, all the time. I'm calling bullshit. Toothpaste might gets some dead bugs off, the same way it'll get dead bugs out of your teeth. But to really whiten and brighten either of them, you need to do a little work.

Herein lies the problem with social media. If an idea sounds plausible, practical and stupid-easy people are willing to share it, like it and pass on this super-secret bit of information with a knowing wink. They've done this with "the toothpaste trick."
Even though they've never tried it themselves.
So of course I had to try the toothpaste trick.
Table of Contents
The Toothpaste Trick -fail
Just take some toothpaste and rub it on your cloudy headlight, then buff it off after it dries a tiny bit.
When I did this, all I got was a minty fresh headlight that looked like it was on the waiting list for cataracts surgery.
So I did my thing, dove into the research, compared the most difficult with the easiest methods and came up with a solution that's in between (but admittedly leaning towards the more difficult because those are generally the methods that actually work)
Why Headlights Get Cloudy
It's because headlights are made of plastic now, not made of glass the way they used to be. They're coated with a UV protectant to keep the plastic from getting ruined and drying out.
That UV protection is what becomes a disaster over time, clouding up, getting brittle, oxidizing and making your headlights opaque.
To make them shine again you need to scrape off that yellow, cloudy, flaking UV protectant.
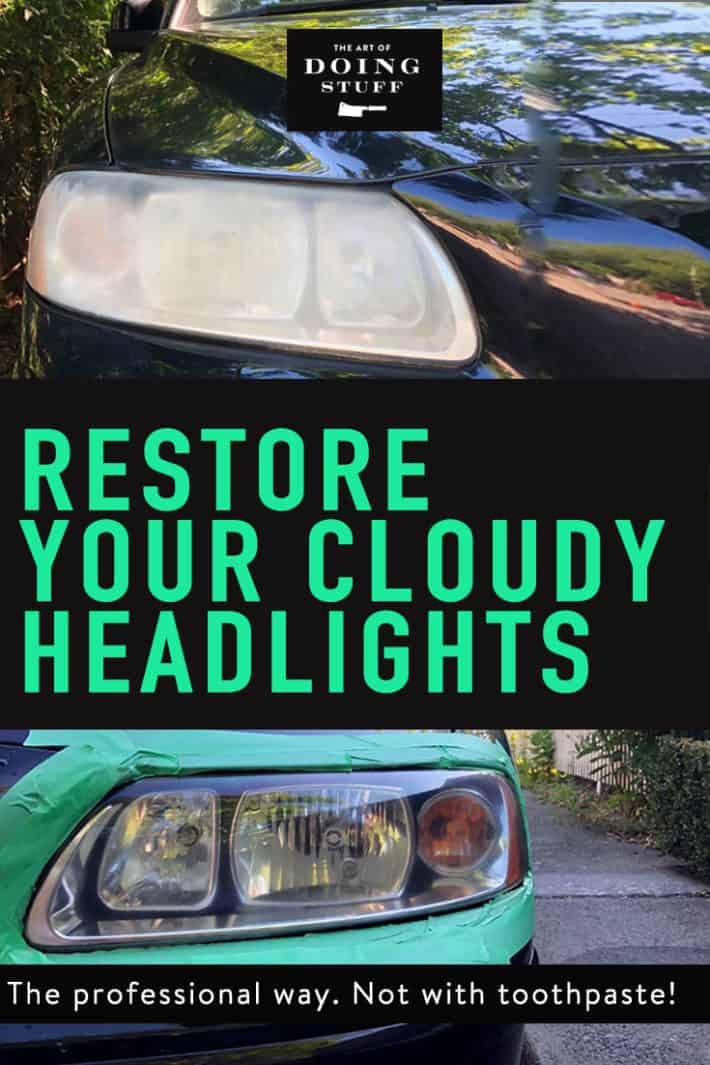
It's a bit of work and will probably take you around an hour. Not convinced? Here's my before and after.
Good. I'm glad you've decided to go ahead with restoring your headlights. You're a champ.
Headlights From Cloudy to Clear

To clean your headlights you have to sand off the portion of them that's actually cloudy. That's the old UV coating. The best way to do that is with sandpaper.
Materials
320 - 800 grit sandpaper
1000 - 1500 grit sandpaper
2500 - 3000 grit sandpaper
Padded sanding block or dish sponge
Isopropyl Alcohol
Headlight polish/levelling compound
Headlight Clear Coat/UV Protectant
Orbital Sander
Water
Soft Cloth
Painter tape
**Or - you can go the easier and probably cheaper route and buy an entire kit on Amazon.**
Entire Headlight Restoration Kit (hand powered with drill attachment for polishing)
Entire Headlight Restoration Kit (drill powered)
I didn't even THINK of checking Amazon for headlight restoring kits so I bought everything separately at my local automotive store.
Automotive stores are where you can get sandpapers with this sort of grit along with the polish and clear coat.
Instructions
320 - 800 Grit (dry sand)
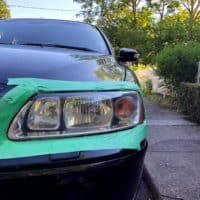
- Tape around your headlights to protect your car paint. You can use masking tape. I used painters tape.
- Sand, yes SAND, your headlights in a left to right motion. The worse your headlights are the lower the grit number you should use. I started with 800, but probably should have used 400 to make the job easier. Keep your sanding pressure even and fluid. Your headlights will get even cloudier at this point.
- Rinse the headlight with water and wipe with a cloth to clear away any debris.

1000 - 1500 Grit (damp sand)
4. With a little water on the sandpaper sand the headlight again with this finer grit sandpaper in an up and down motion. The reason you change directions is because you're sanding down the ridges you've caused by the rougher grit sandpaper earlier.
5. Rinse with water and wipe with a soft cloth to get rid of plastic debris.

Would you like to save this stuff?
2500 - 3000 Grit (damp sand)
6. The final sanding step is to use the finest grit with a little water and sand in a left to right motion again.
7. Rinse with water, wipe with soft cloth.

Buff/Polish With Wool or Microfibre Pad
8. Attach a microfibre of sheepskin pad to an orbital palm sander.
9. Add compound to the pad and rub the polish into the pad so it's evenly saturated.

10. Polish headlights. The headlights will start to look clearer now.

Wipe with Isopropyl Alcohol
11. Wipe the headlights clean with Isopropyl Alcohol.

Spray with Headlight Clear Coat
12. Apply the clear coat / UV protectant according to directions. Mine was a spray, yours may be a liquid you wipe on.

You're done.

Take a look at the before and after again.
Cleaning your cloudy headlights doesn't just make your car look better it increases the output of your headlights by 400X. I made up the 400X but it makes a huge difference.
You'll be able to see in front of your car better at night and other people will better be able to see you.

All for about an hours worth of work and around $25 (if you buy one of the kits). Here are the links to the kits again:
2. Headlight restoring kit with drill attachment for all steps.
I'd personally buy the first kit because it has a separate polish and UV coating. The second kit seems to just have the polish.
How to clean headlights
Instructions
320 – 800 Grit (dry sand)
- Tape around your headlights to protect your car paint. You can use masking tape. I used painters tape. Sand, yes SAND, your headlights in a left to right motion. The worse your headlights are the lower the grit number you should use. I started with 800, but probably should have used 400 to make the job easier. Keep your sanding pressure even and fluid. Your headlights will get even cloudier at this point.Rinse the headlight with water and wipe with a cloth to clear away any debris.
1000 – 1500 Grit (damp sand)
- With a little water on the sandpaper sand the headlight again with this finer grit sandpaper in an up and down motion. The reason you change directions is because you’re sanding down the ridges you’ve caused by the rougher grit sandpaper earlier.Rinse with water and wipe with a soft cloth to get rid of plastic debris.
2500 – 3000 Grit (damp sand)
- The final sanding step is to use the finest grit with a little water and sand in a left to right motion again.Rinse with water, wipe with soft cloth.
Buff/Polish With Wool or Microfibre Pad
- Attach a microfibre of sheepskin pad to an orbital palm sander.Add compound to the pad and rub the polish into the pad so it’s evenly saturated.Polish headlights. The headlights will start to look clearer now.
Clean
- Wipe the headlights clean with Isopropyl Alcohol.
Clear Coat
- Spray with Headlight Clear CoatApply the clear coat / UV protectant according to directions. Mine was a spray, yours may be a liquid you wipe on.You're done!
If your headlights are a disaster, ditch the toothpaste. Do the job right.
→Follow me on Instagram where I often make a fool of myself←


I'm grateful for this for two reasons.
1) Because I needed an Amazon link from your portal because I'm tired of buying stuff that benefits nobody. Never. And why wouldn't I prefer to benefit my fav northern-most blogger? The one with the Prime Minister who is hotter than ours. (Who is NOT hotter than ours?)
2) I have a spiffy new car that I actually wash, vacuum, think about and love. Sigh. And someday in the very distant future, I might need this. VERY cool!
Now... about that newsletter mailing list...
can it use that spray on my old scratchy reading glasses?
Hmmmmm, wonder what I'm missing? We keep our cars (Hondas) for 17-18 years and never had a prob with cloudy headlight lenses. Maybe some brands are more/less prone? Maybe it's because I seldom wash my car....
And I guess I'm one of the dead people cuz I'm not on Facebook 😏.
Maybe your cars are old enough to still have glass headlights. ;) ~ karen!
Can't thank you enough for this, Karen. We have 2 cars and a truck that need this treatment. In the past Man-Unit put up a fuss whenever I suggested we do this and gave all kinds of lame reasons why it wasn't a god idea. I showed him your pics and told him there is no room for negotiation. Have you seen the price diff on the heavy duty kit between Amazon.com ($21.47) and Amazon.ca ($61.21)!!! Going stateside in a couple of weeks anyway. I checked the Q&A on this and it looks like there is enough product for 3 vehicles. Bonus!
You could still go to Canadian Tire (or a car parts shop) and get all the stuff, but I feel like the kit just makes the whole thing so much easier. ~ karen!
OK Smarty Pants... love the write up. Tell me how to keep water out of my headlights!
Took the bad one out, took it apart and remove the old sealing gunk, caulked in new silicone sealing gunk, and it still fills up with water... Just ended up going to RockAuto.com and got new ones. Crazy! Had an old Explorer that did that, just drilled hole to let the water drain. ;-)
Do love your site and writeups.
That I do not have an answer for, lol. Although I think your drainage idea is probably pretty good! ~ karen
Fantastic! I have tried several types of toothpaste and none of them worked...Going to have to order the kit! You ROCK, Karen!
I actually tried the toothpaste, bought a $1 tube (has to be the regular white, not the gel) at the dollar store and it worked! That was about 4 years ago. I don't have the car anymore so I can't say how long it lasted :).
This is awesome and FINALLY...there are pics and details. I tried different toothpastes and did not work. I can't wait to try on my car & be able to see 400X better ; ) Thanks
My car has cataracts - I had mine removed last fall and it was amazing how much I was missing. Got to get that kit and give my 2010 car a new lease on life. Driving at night has become a problem and I thought it was my eyes - who knew? Karen this post alone is worth the price of the subscription to your site - price meaning time I spend reading it. THANK YOU! I do think the kits would make great gifts for others, also.
The very best method is to have your brother to do it for you. LOL.
I honestly hadn't even realized how cloudy my headlights were but my brother did. He had borrowed my Jeep for the day and when he returned it he told me he'd polished the headlights. I was all "oh thanks, great, whatever" until the next time I drove at night.
Holy smokes!! It was like having the high beams on without having the high beams on. I had not realized how much light was getting blocked from the hazing.
I made sure I thanked my brother profusely the next time I saw him.
Hi Karen,
I use a simpler method I had heard about: Get some DEEP WOODS OFF spray. Yes, the stuff that keeps mosquitos from biting you. No need to tape anything off. Spray it on your headlights. Wipe it off with a paper towel. Repeat until paper towel shows no yellow residue. The chemical reaction melts away that top oxidized layer. I do this about once a year to keep the plastic looking clear.
holy crap...I guess that's another reason (besides possible neuro-toxicity) not to use that stuff on myself.
Although on second thought: would this be like getting a chemical peel at the dermatologist? Total skin rejuvenation???
Ha ha! Well, since we’re not made of plastic I don’t worry about it. I DO worry about ticks and Mosquitoes when I walk my dogs or work in the yard. Also, the West Nile virus has appeared in my area for three years in a row. We’re advised to wear long pants and sleeves, which, in 100 + degrees Fahrenheit is hard to do.
Kinda sounds like the time my sunscreen took the dark coating off my sunglasses. Maybe I should just rub some Tropic Tan onto the lights and hope for the best.
The kit is super easy and fast - and does a great job.
I have a 2015 Wrangler. I think it just has headlights, not a fancy-shmancy light cover. Scared to go out and look now! When my children come to visit I will have to sneak out and look at their cars. Thanks Karen!
Will this work to rejuvenate my face?
Absolutely Julie!
No question about it!
Fills all the wrinkles, bleaches out pigmentation, zaps spots & if your dog decides to lick your face, he will have fresh breath too! Win, Win!!
This is so cool!
Silver polish works well (or brasso if you have that - it's a wipe on/off cleaner for brass). I got taught that trick by a mechanic and its helped my cars pass multiple warrants of fitness over the years, including when I failed on the first go round.
Not sure how one comes to find out that toothpaste works. How many compounds did "they" try first?
I had no luck with toothpaste either, but did have some success with mosquito spray. Again, no idea what prompted someone to give that a try.
so how expensive would replacement lights be? LOL
$500 - $700. Minimum! ~ karen
That totally depends on your vehicle. It would be around $100 for me to replace both of mine:
Which, while nowhere near $500, is still significantly more than $20 of course.
Yup, I had to do this last year when the car failed the govt. test. The light wasn't even making it out of the lens enough to check the alignment!
I did the sanding thing and then bought a two pack spray can thingy which brought the sanded lenses up to better than new actually. The same paint is used to paint bowling balls and pins so you can imagine how hard it dries. Cost of two new headlamps =$400, cost of sandpaper and paint set = less than 50 bucks... Bargain and better for the planet too. :-)
Very nice! ~ karen
Hi Ian,
In a search to find the product you might be referring to in your comment ... "two pack spray can thingy", I wandered over to your site link. HaHA! While I may not have found the answer there, I did find much-needed info in deciding the fate of our lath and plaster kitchen ceiling in our 1928 home. Thank you!
If you could please share the name of the product you used, I have bowling balls awaiting! Bet Karen does too ;)
Hi guys, yes the products were from 'Spray Max'. Pretty widespread availability I believe. Not for those with a lackadaisical attitude to health and safety though. Serious chemicals with some pretty fierce solvents. A proper mask is pretty essential (not a paper one).
I did mine outside with a proper dust mask but it wasn't good enough and I had to keep the cans at arms length.
That said, as with many other things, the stuff available to professionals far outperforms the 'cheap' stuff sold in the DIY arena...
Thanks Ian.
Good advice. I'll be sure to haul out my good mask before I get started! -jan
That's neat!!! I always wondered about the toothpaste hokum. Seems you'd really want to replace the UV coat, regardless of toothpaste or sanding. I am amazed I never came across the headlight UV coat before. Love it when I learn new things!
They look great, I will definitely try this on my car. Btw - waiting for cataract surgery - loved that!
Gotta tell ya girl. Toothpaste definitely works, but it must be the solid white paste, not the gels. Applied the toothpaste with a bunched up paper towel on a dry headlight, in about 2 square inch applications, rubbed in circular motion applying a little pressure then immediately wiped it off. Took about 10 minutes total for both headlights.
If anyone tries it, try it in the center of the light so you can see the difference. It's amazing really.
A tube of toothpaste from the Dollar Tree is a cheap fix.
My experience.
Good to hear it worked for someone! You must have had more reasonably clouded headlights (if it only took you 10 minutes in total for both headlights then they definitely weren't an extreme case). Don't forget to reapply a coat of UV spray to them. ~ karen!
I bet lights are made of different kinds of plastic, and not all of them will yield to the toothpaste treatment...